


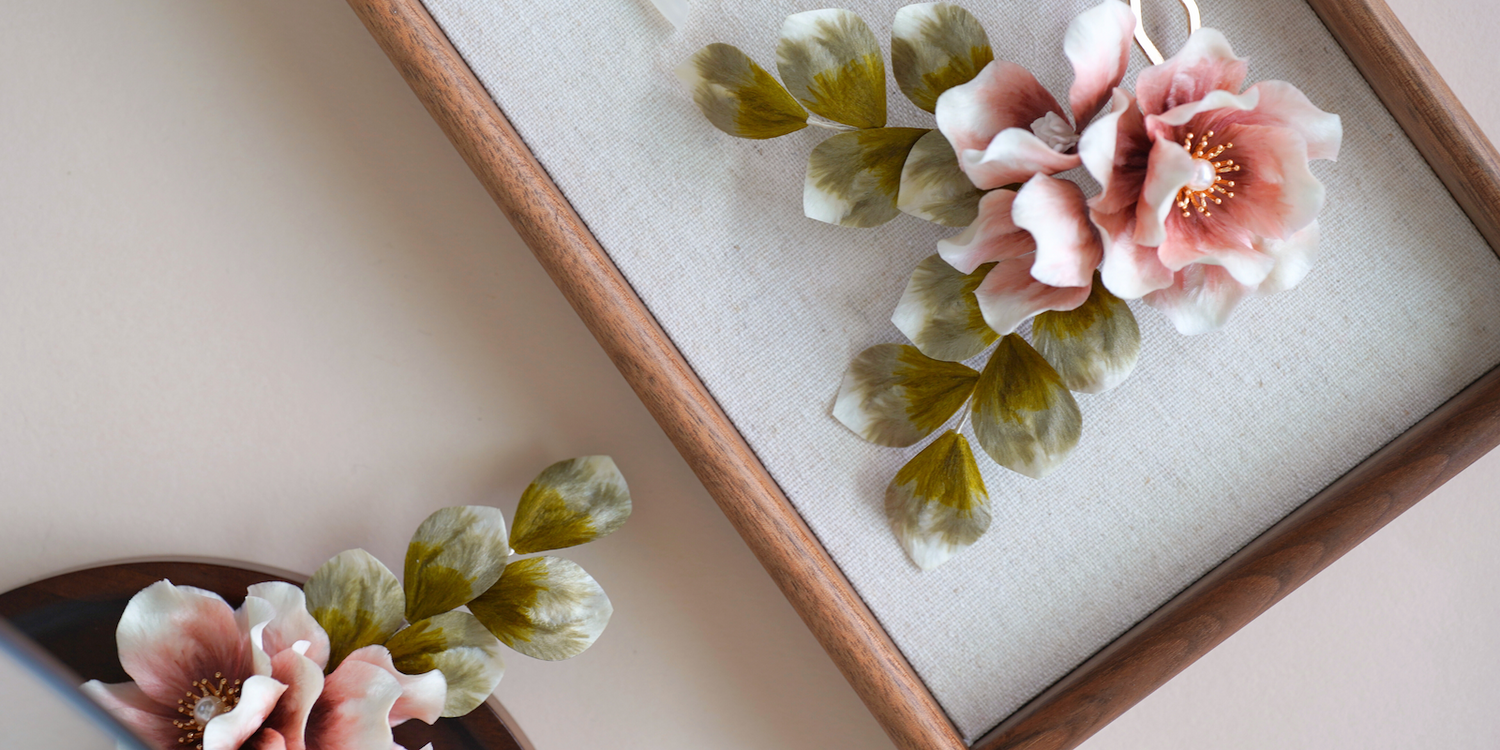
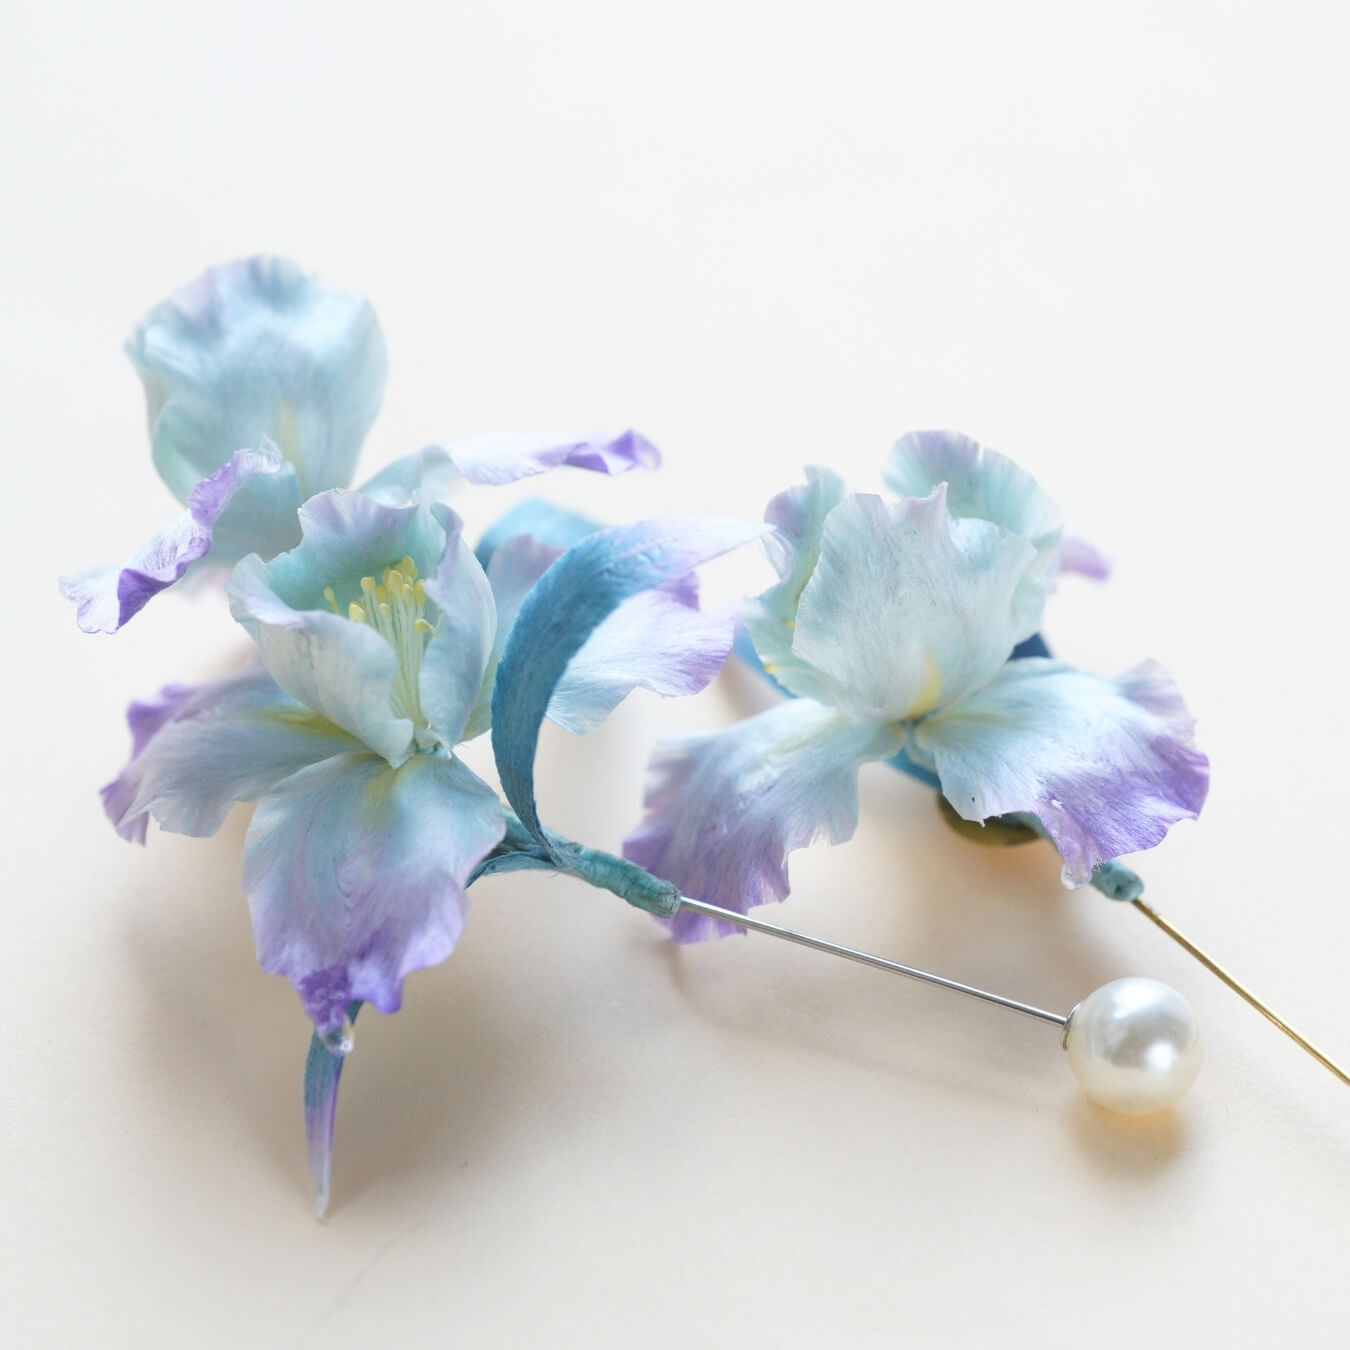
Inspiriert vom sanften Erröten der Frühlingsblüten vereint die Pink Bloom Haarnadel geschichtete Seidenblütenblätter und elegante Struktur. Dieses Tutorial führt dich durch jeden Schritt, um dein eigenes weiches, romantisches Stück zu kreieren.
Vorbereitung: Was Sie benötigen
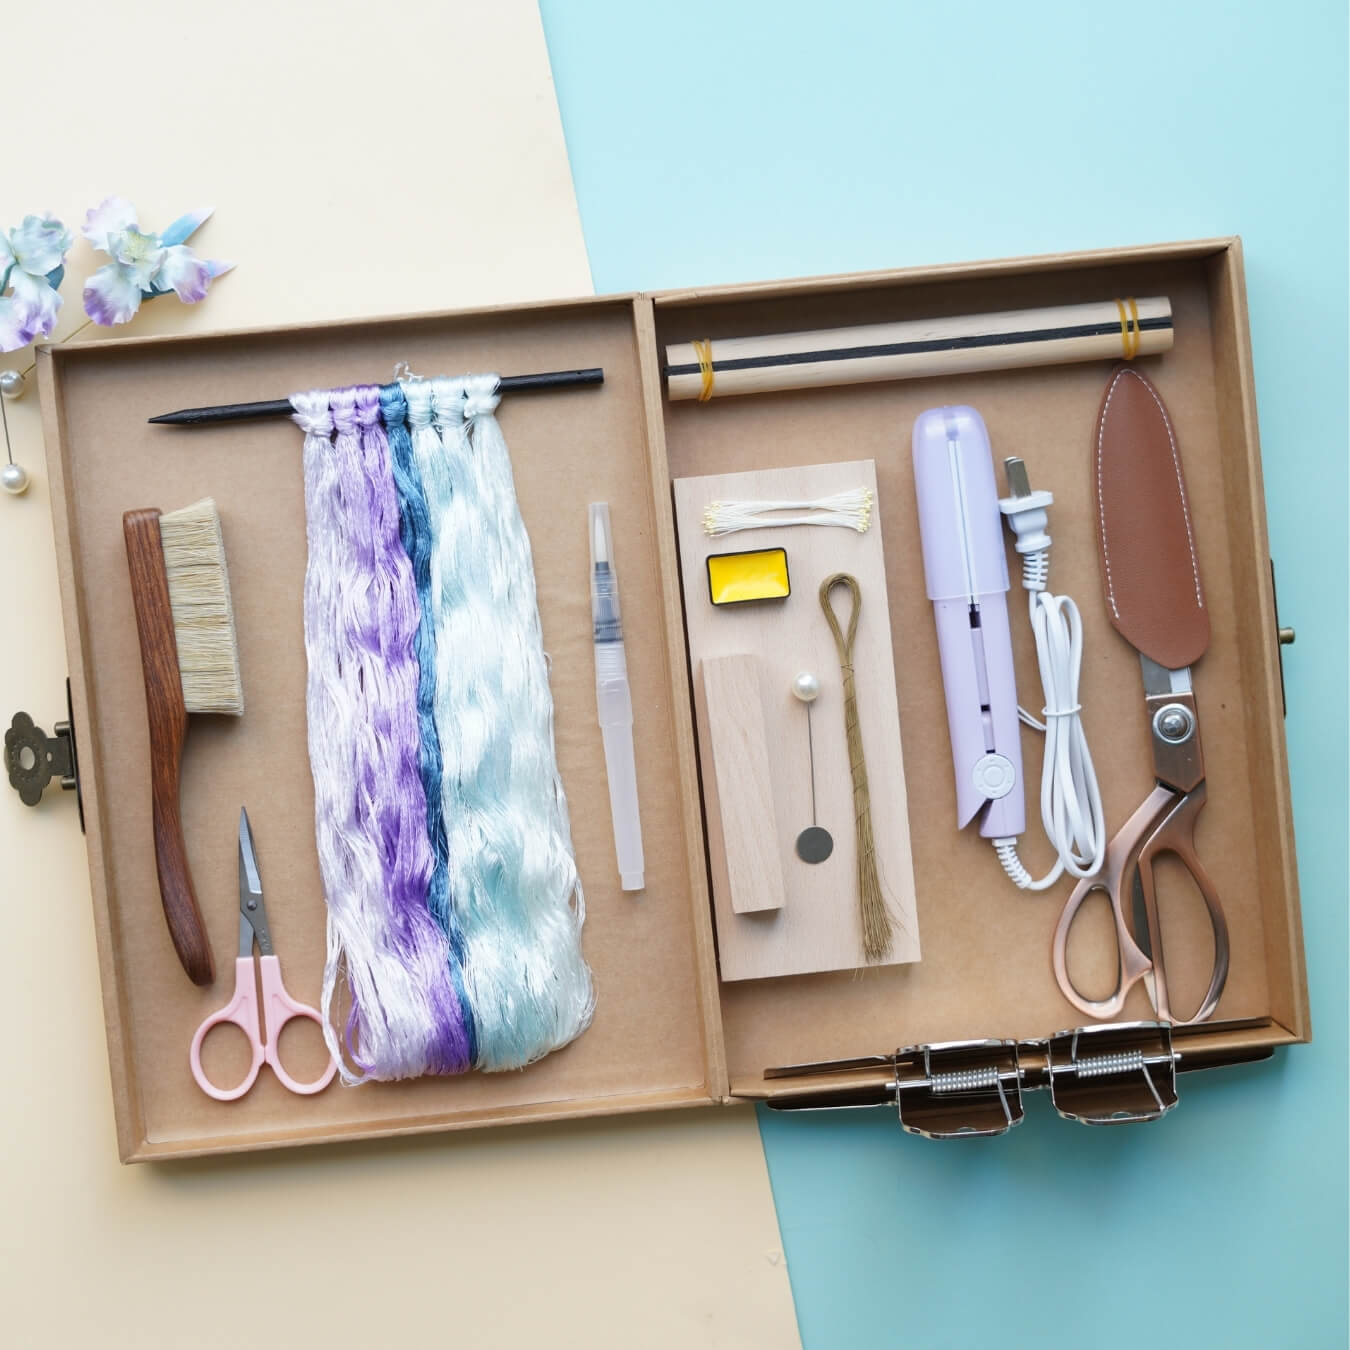
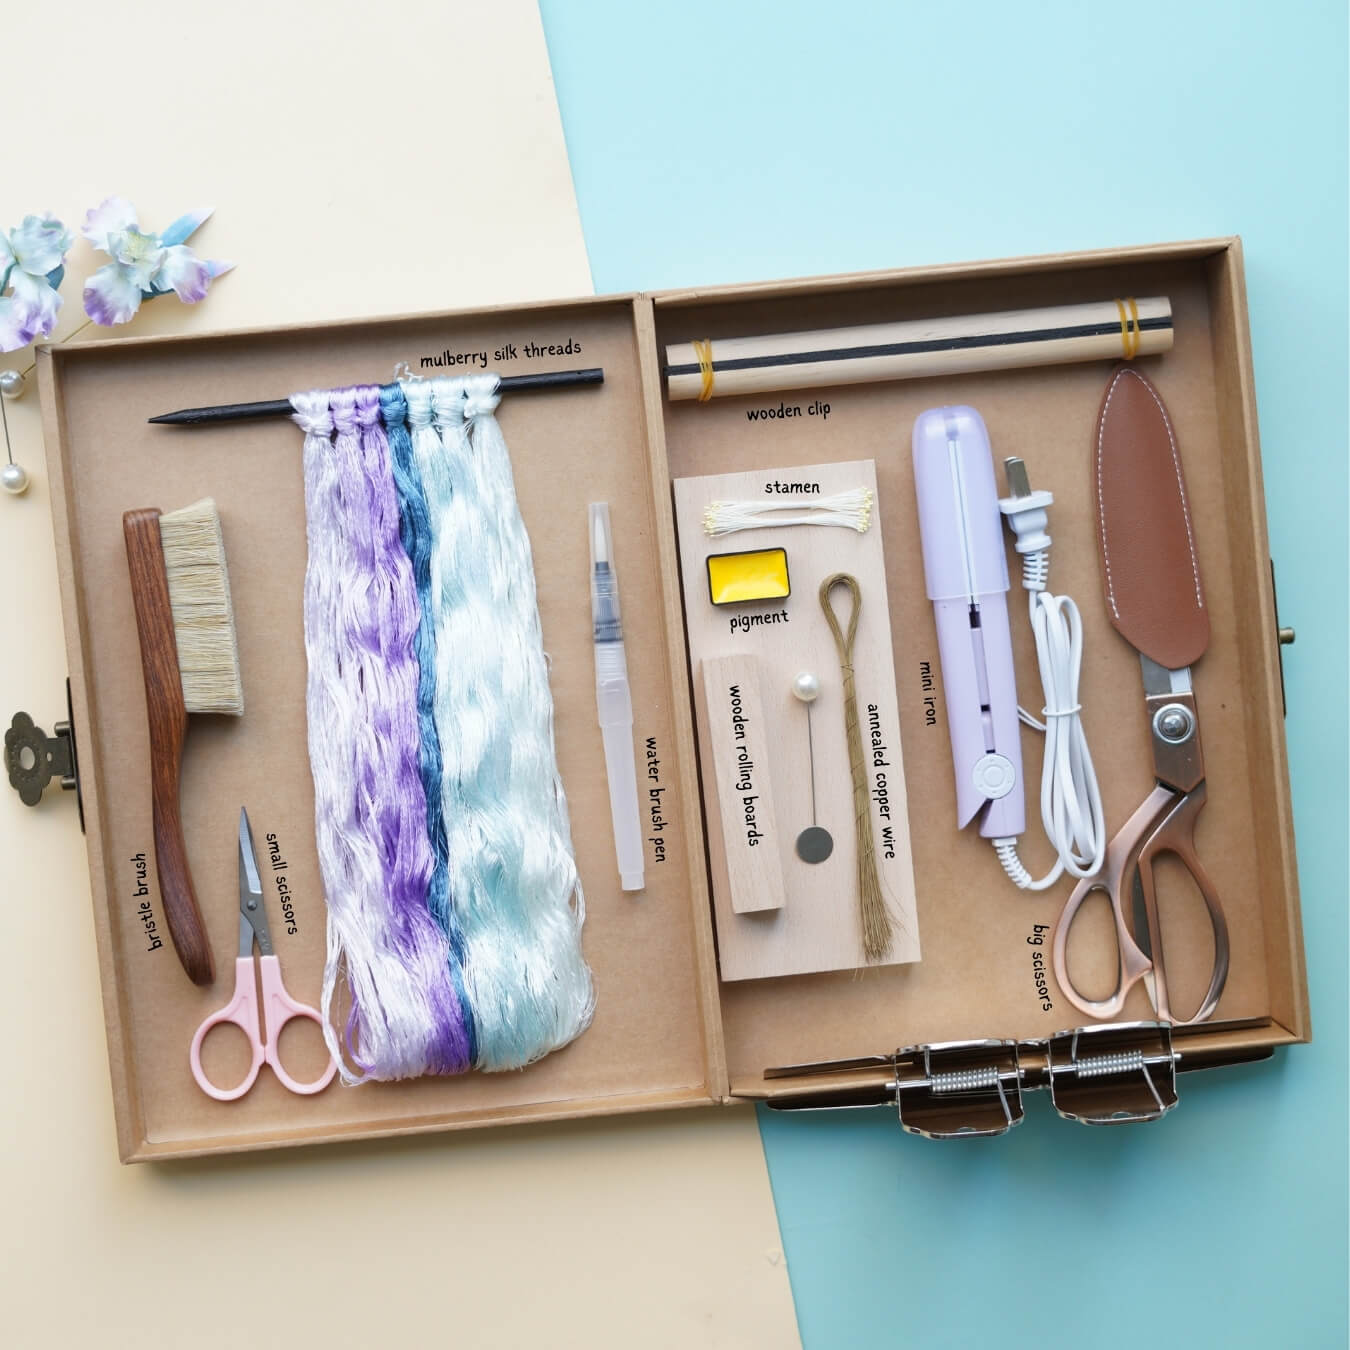
Wenn Sie unser Ronghua Toolkit gekauft haben, haben Sie bereits alles, was Sie brauchen!
Falls nicht, bereiten Sie die folgenden Werkzeuge vor:
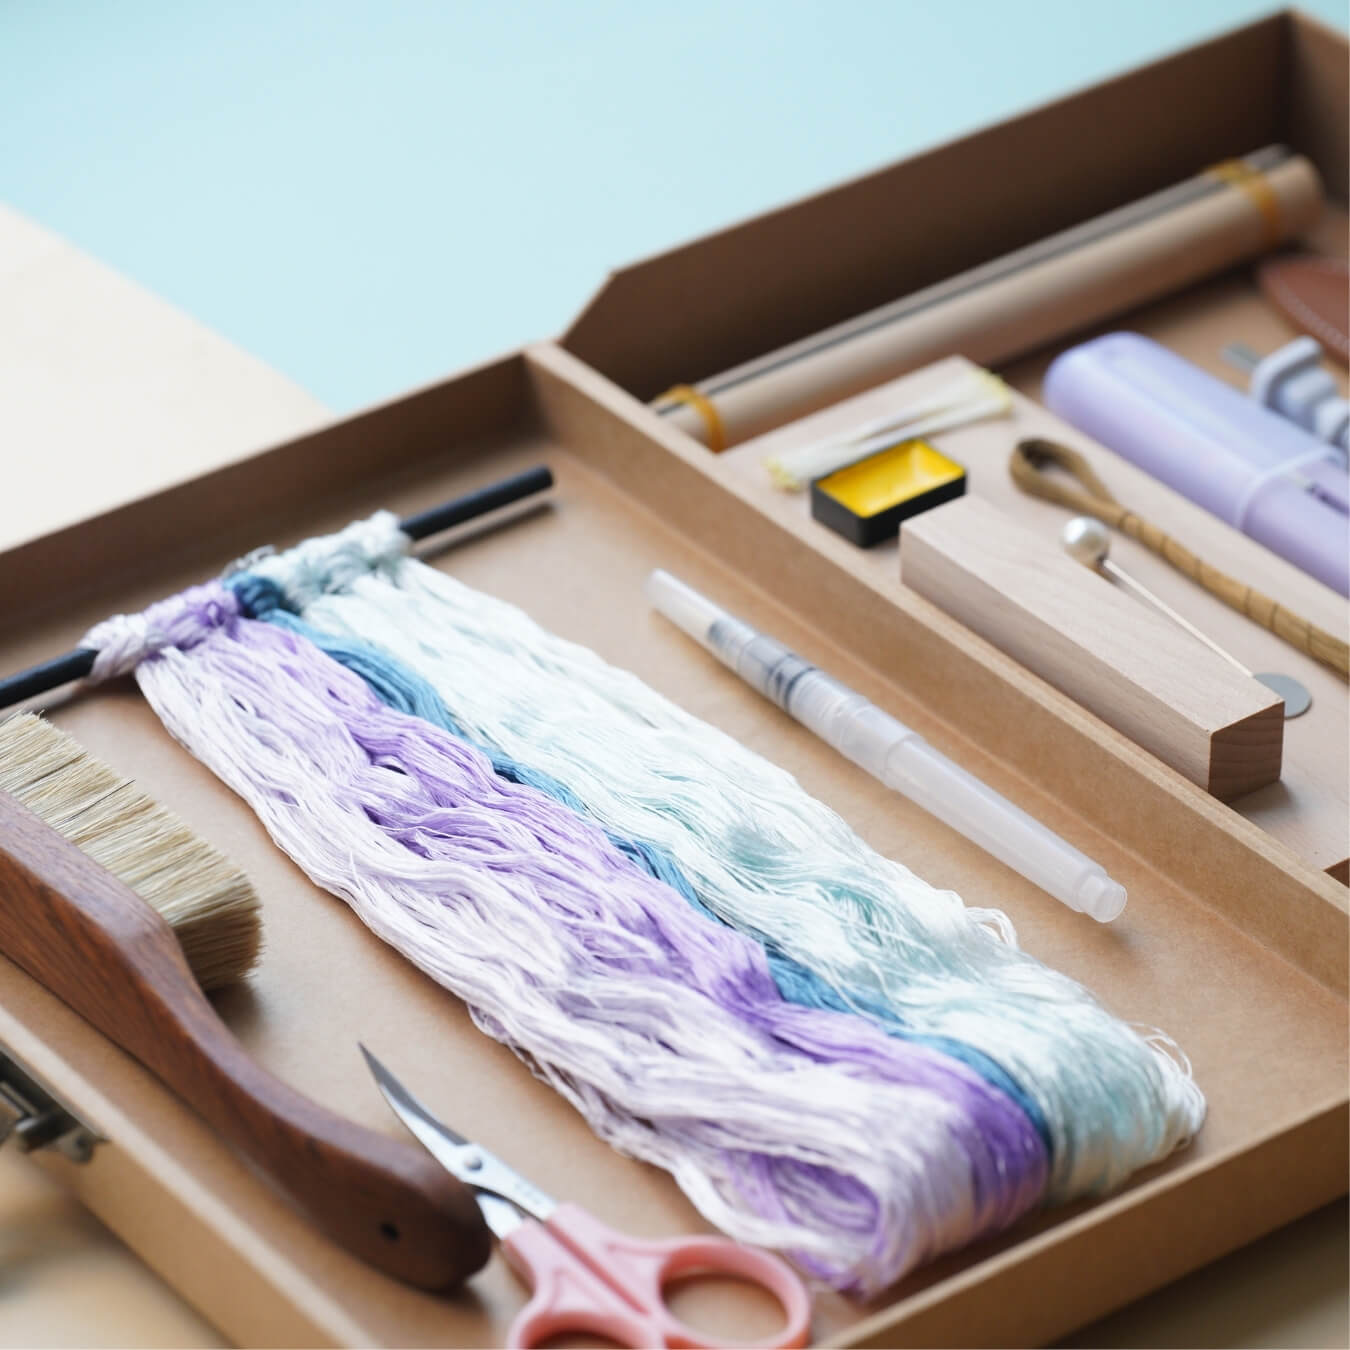
- Bürste mit Borsten (mittel bis weich)
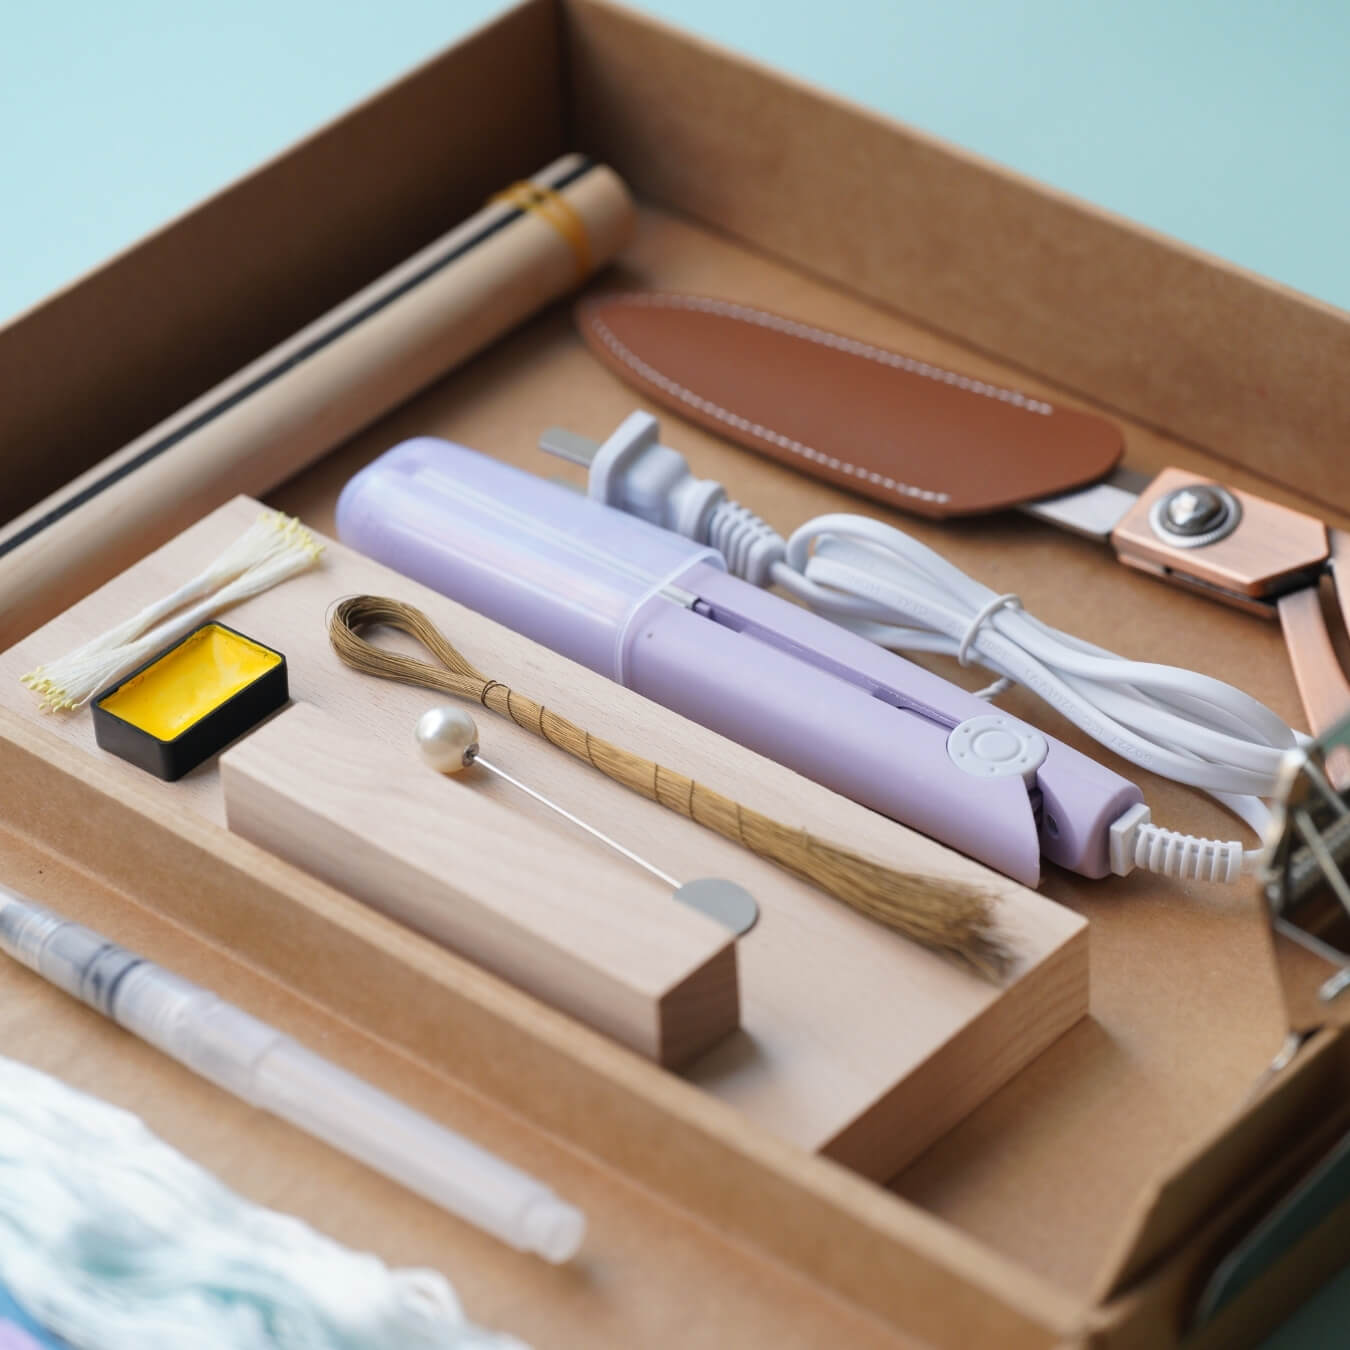
- Glätteisen (das, mit dem Sie Ihr Haar glätten)
- Pinzette
- Mindestens 2 Paar Scheren
- Holzstäbchen / Bleistifte / Essstäbchen
- Haarspray oder verdünnter Weißleim (Verhältnis 1:1,15–1:1,2)
- Große Klammern (ca. 15cm)
- Drehbretter und Holzklötze (für gleichmäßige Spannung)
- Anti-Rutsch-Pulver (optional, aber hilfreich)
Vollständiges Tutorial-Video
Schritt 1. Ausrichten und Anordnen der Seidenfäden
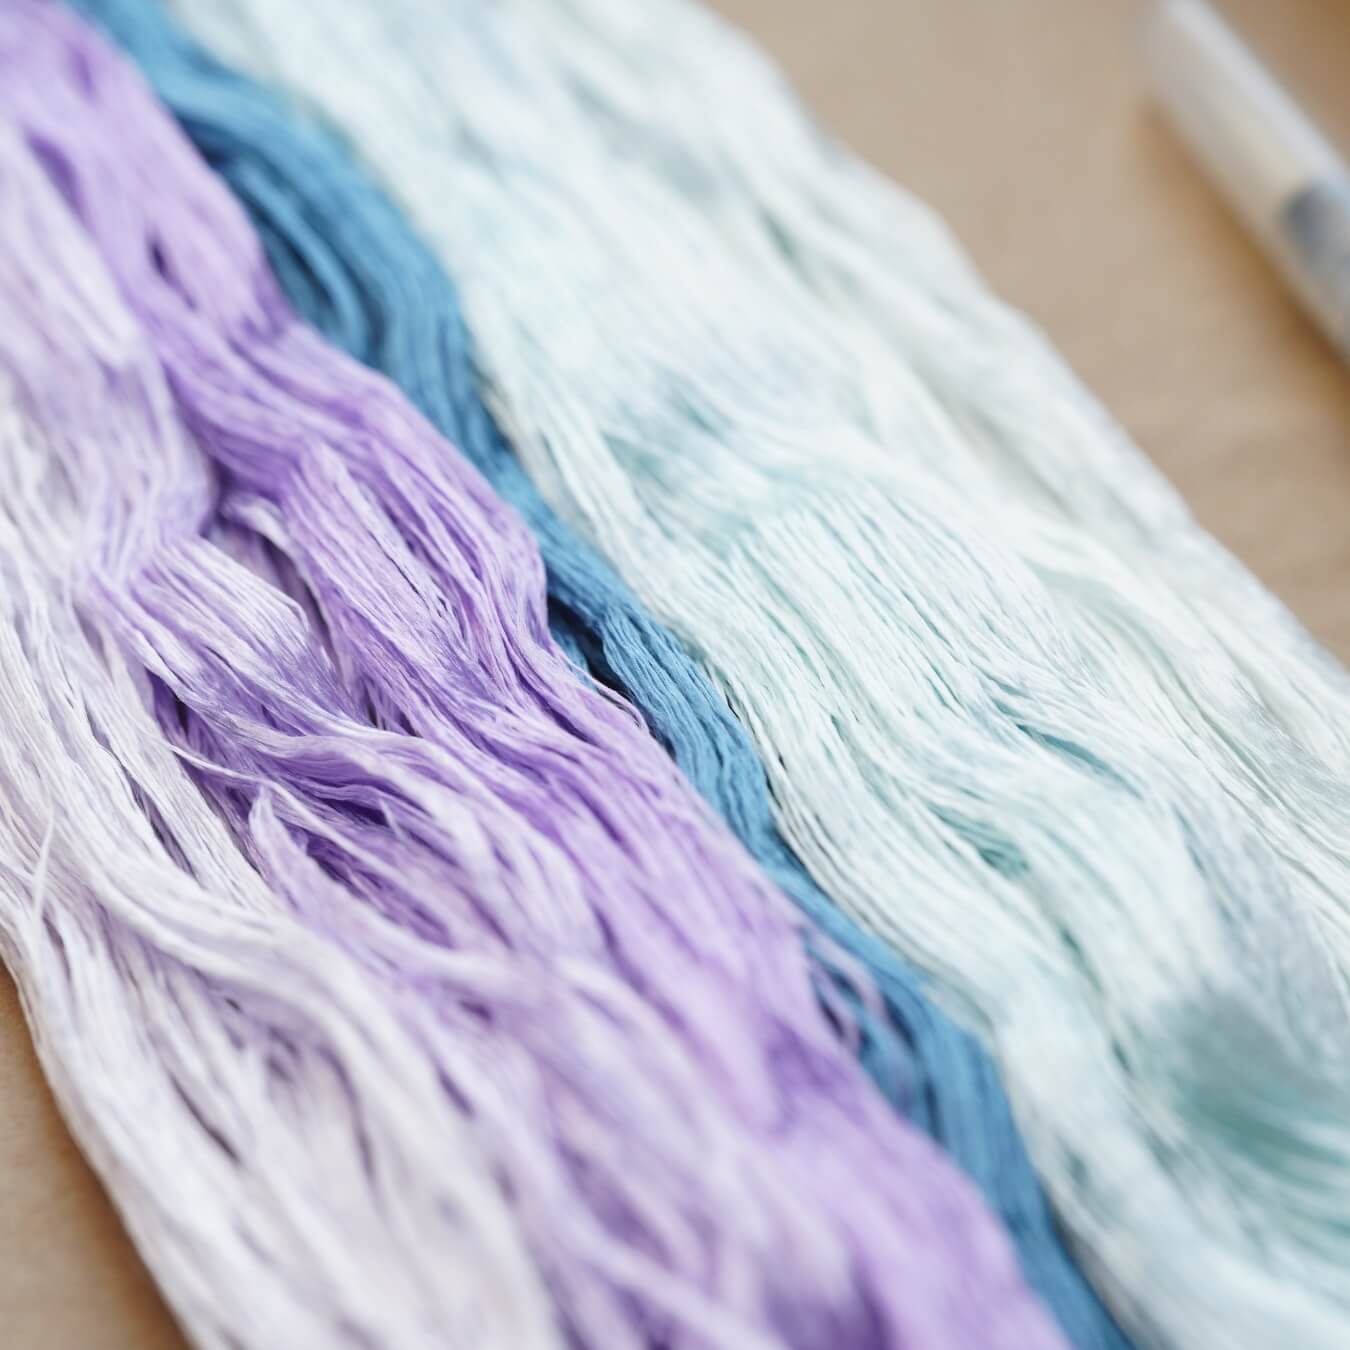
Beginnen Sie damit, Ihre Seidenfäden zu entwirren. Finden Sie den Knoten an einem Ende jedes Bündels und schneiden Sie ihn vorsichtig auf. Für dieses Projekt werden 7 Seidenfarben verwendet, um 2 Seidenreihen zu erstellen. Siehe das Farbschema unten für Details zur Fadenkombination.

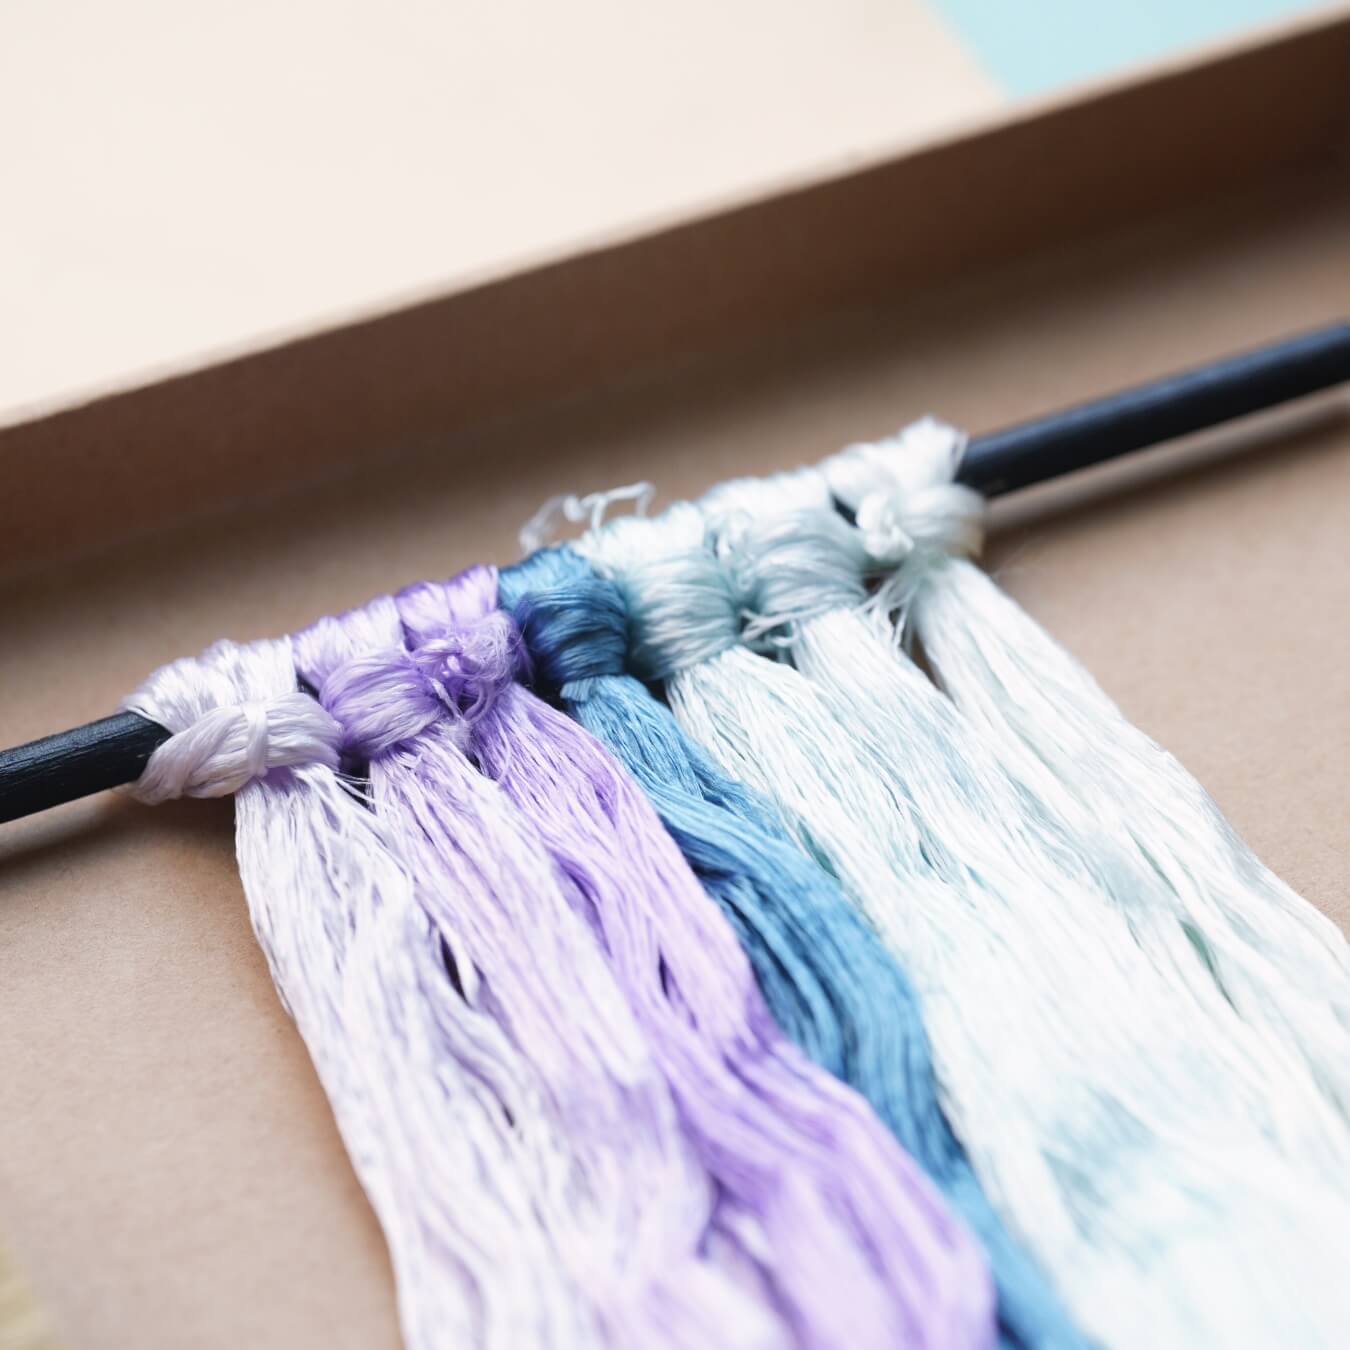
Schritt 2. Gruppieren und Vorbereiten der Fäden
Jedes Seidenbündel besteht aus winzigen, fadenähnlichen Strukturen – das sind Ihre einzelnen Stränge.
Richten Sie alle Stränge ordentlich aus und binden Sie sie um einen dünnen Stock, wobei die Enden gleichmäßig bleiben. Vermeiden Sie ungleichmäßige Längen – das sorgt später für eine gleichmäßige Textur.

Schritt 3. Seidenreihen herstellen
Wiederholen Sie den obigen Vorgang, um insgesamt zwei Seidenreihen herzustellen. Denken Sie daran, für die folgenden Reihen auf die im Diagramm angegebenen Daten zurückzugreifen, da jede leicht unterschiedlich sein wird.
Schritt 4. Bürsten Sie die Seidenreihen
Befestigen Sie eine Seidenreihe mit großen Metallklammern an Ihrem Ständer – wenn Sie keinen hölzernen Ronghua-Ständer haben, ist das völlig in Ordnung! Sie können sich unser Video zu alternativen Lösungen zum Ständer ansehen.
Halten Sie die Enden der Fäden mit einer Hand und bürsten Sie sanft, aber fest von oben nach unten. Heben Sie die Bürste nicht zwischendurch an. Ein leichter Wassernebel verhindert statische Aufladung. Sie können etwas Druck ausüben – Seidenfäden sind stärker, als sie aussehen! Bürsten Sie sowohl die Vorder- als auch die Rückseite, bis die Reihe glatt und flauschig aussieht.

Jeder verwendet eine andere Bürste und Handgeschwindigkeit, daher variiert auch die Zeit, die für diesen Schritt benötigt wird. Bei mir hat es etwa 10 Minuten gedauert, diese Seidenreihe zu bürsten. Wenn Sie das Gefühl haben, dass das Haar weich und flauschig ist, können Sie aufhören und nachsehen. Wenn es keine klare lineare Abgrenzung zwischen den Fäden mehr gibt und sie anfangen, aneinander zu haften, ist es fertig:)
So fühlt sich der gebürstete Seidenfaden an:

Schritt 5. Kupferdrähte anbringen
Wenn Sie das Gefühl haben, dass die Seide ausreichend gebürstet ist, sichern Sie ihren Schwanz mit einer weiteren großen Klammer an Ihrem Tisch oder an etwas, das hilft, sie straff zu ziehen. Nehmen Sie einen geglühten Kupferdraht vom gefalteten Ende der Reihe heraus und richten Sie ihn gerade. Drehen Sie den gefalteten Teil zu einer Spirale von etwa 3 cm. Klemmen Sie die Seidenfäden zwischen zwei Kupferdrähten ein und drehen Sie die gegenüberliegende Seite fest. Ziehen Sie beide Drähte straff und drehen Sie weiter, bis sie zu einem verschmelzen. Denken Sie daran, dass die Drehrichtung für das linke und rechte Ende entgegengesetzt ist.

Der Abstand zwischen den Drähten sollte 1,3 cm betragen.
Wenn Sie Anti-Rutsch-Pulver haben, wird es viel einfacher sein, Ihre Finger darin zu tauchen und zu drehen. (Wir empfehlen Ihnen dringend, das Video-Tutorial für diesen Schritt anzusehen:)
Sobald Sie fertig sind, nehmen Sie die Seidenreihe vom Ständer und legen Sie sie flach hin.
Schritt 6. Schneiden Sie die Seidenstreifen
Schneiden Sie das Ende der Reihe sauber ab, dann schneiden Sie zwischen jedem Kupferdrahtpaar , um gleichmäßige Seidenstreifen zu erzeugen. Beim Schneiden müssen die Scheren genau in der Mitte zwischen zwei Kupferdrähten angesetzt werden, sonst wird die Breite der Seidenstreifen ungleichmäßig. Wenn Fäden an Ihren Scheren kleben, reinigen Sie sie — das wird meist durch statische Aufladung oder Rückstände verursacht. Schneiden Sie schnell und sauber für glatte Kanten. Berühren Sie den Draht nicht, da er sonst verrutschen kann.

Schritt 7. Die Streifen zentrieren und drehen
Richten Sie den Kupferdraht mit einer ebenen Fläche oder einem Holzblock in der Mitte jedes Streifens aus.
Sobald zentriert, drehen Sie beide Hände in entgegengesetzte Richtungen, um zu spannen.

Als Nächstes legen Sie den Kupferteil zwischen die Drehbretter und drehen weiter in dieselbe Richtung. Stoppen Sie, wenn sich der Draht fest anfühlt — zu starkes Drehen kann ihn brechen. Woran erkennen Sie, ob er fest genug ist? Wenn er richtig festgezogen ist, sollte der Kupferdraht nur schwach sichtbar sein. Wenn der Kupferdraht sehr sichtbar ist, ist er nicht fest genug.

Schritt 8. Die Streifen flachdrücken


Dann müssen wir die flachgedrückten Streifen verstärken.
Bereiten Sie Ihre Fixierlösung vor:
- Verwenden Sie entweder Haarspray oder
- Verdünnter Weißleim mit Wasser oder Alkohol (Verhältnis 1:1,15 oder 1:1,2)

Schritt 8. Machen Sie die Blumen
Sie benötigen zwei Arten von Blumen: eine große und eine kleine. Insgesamt brauchen Sie nur eine große Blume und zwei kleine Blumen.
Für die große Blume:
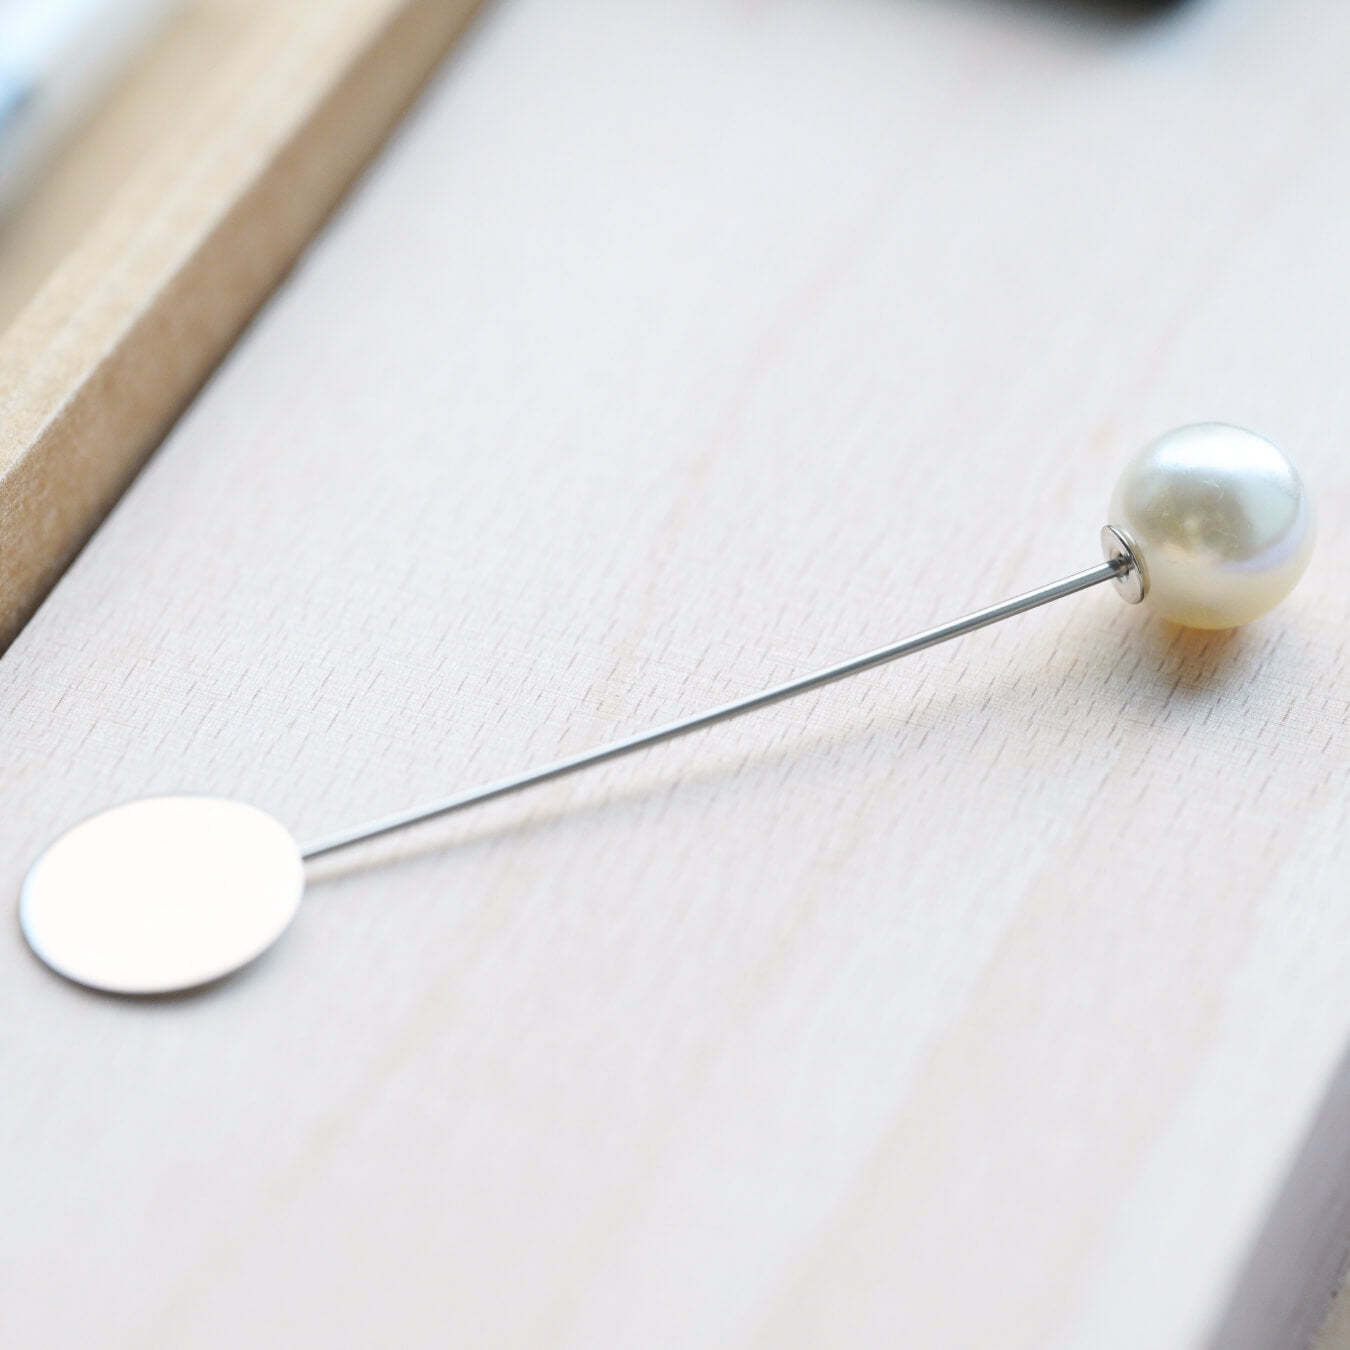
Fädeln Sie eine silberne Perle auf jeden Draht, drehen Sie die Enden fest, um sie zu sichern, und rollen Sie dann den verdrehten Teil. Richten Sie den perlenbesetzten Draht gerade und führen Sie ihn durch die Blumenmitte.

Beginne mit dem Zusammenbauen der Blume, indem du den Draht fest in deiner linken Hand hältst – so verhindern du, dass die Blütenblätter sich beim Arbeiten lockern. Füge jedes Blütenblatt einzeln zur Blumenmitte hinzu und ziehe den Draht bei jeder Wicklung leicht an, um die Struktur stabil zu halten.
Beginne mit vier kleinen Blütenblättern für die erste Schicht, die dicht beieinander liegen. Achte darauf, dass die Basen aller Blütenblätter auf derselben horizontalen Linie ausgerichtet sind. Für die zweite Schicht füge sechs Blütenblätter hinzu, die sich leicht überlappen und in einem natürlichen, spiralförmigen Rhythmus angeordnet sind. Mach dir keine Sorgen, wenn die oberen Kanten in diesem Stadium ungleichmäßig aussehen – solange die Basen korrekt positioniert sind, kannst du die Blütenblätter später für ein ausgewogenes Aussehen anpassen.

Für die kleinen Blumen:
Nimm einige Staubblätter. Falte sie und schneide sie in der Mitte durch. Wickle die Staubblätter mit Seidenfaden und beginne, die Blütenblätter einzeln mit einer ähnlichen Methode zusammenzusetzen. Für jede kleine Blume benötigst du drei Blütenblätter.

Schritt 9. Baue das Teil zusammen
Wir beginnen mit der Herstellung der Zweige. Wir brauchen zwei Zweige insgesamt.
Beginne mit den Blättern: Du brauchst einen weiteren Kupferdraht zur Unterstützung. Wickle das Blatt und den Kupferdraht zusammen mit Seidenfaden, dann füge nach einer Lücke von 1 cm das zweite Blatt hinzu. Wiederhole den Vorgang, aber passe die Blattposition an. Setze die Blätter versetzt, damit es natürlicher aussieht. Du wirst brauchen 5 Insgesamt Blätter. Füge eine kleine Blume an den unteren Zweig hinzu und wickle etwa 1,5 cm am Stiel, dann schneide überschüssigen Faden ab. Dann hast du einen kompletten Zweig. Mache zwei davon.

Binde die große Blume an die Zweige und justiere ihre Position und Ausrichtung. Wickle die Stiele mit Seidenfaden nach unten bis zum Boden und dann wieder nach oben, um sie zusammen zu sichern. Falte den unteren Teil etwas nach oben und wickle den gefalteten Teil erneut mit Seidenfaden nach unten und oben.
Beende, indem du den Faden in den Kupferdraht steckst. Wir verwenden eine spezielle Technik, um den Faden spurlos zu binden. Dazu benötigst du ein kleines Stück Kupferdraht oder Faden, das du in der Mitte faltest. Bedecke den Kupferdraht / Faden, wenn du weiter wickelst. Beim Abschluss führst du den verbleibenden Faden durch die kleine Schlaufe des Kupferdrahts. Ziehe dann schnell den Kupferdraht aus dem Ende heraus. Die Fadenenden bleiben innerhalb der gewickelten Seidenfäden. Du kannst den freiliegenden Seidenfaden sicher abschneiden und überschüssiges Material entfernen.
(Wir empfehlen dringend, das Video-Tutorial für diesen Schritt anzusehen:)
Schritt 10. Befestige das Teil an der Haarnadel
Wickle das Teil und die Haarnadel fest zusammen, indem du dieselbe Methode wie oben anwendest: Wickle den Seidenfaden auf und ab um sie herum. Danach beende es mit dem oben erwähnten Kupferdraht-Trick, um ein sauberes Finish zu erzielen. Schneide überschüssigen Faden ab.

Schritt 11. Letzte Anpassungen
Justiere die Position und Ausrichtung der Blumen vorsichtig mit einer Pinzette.
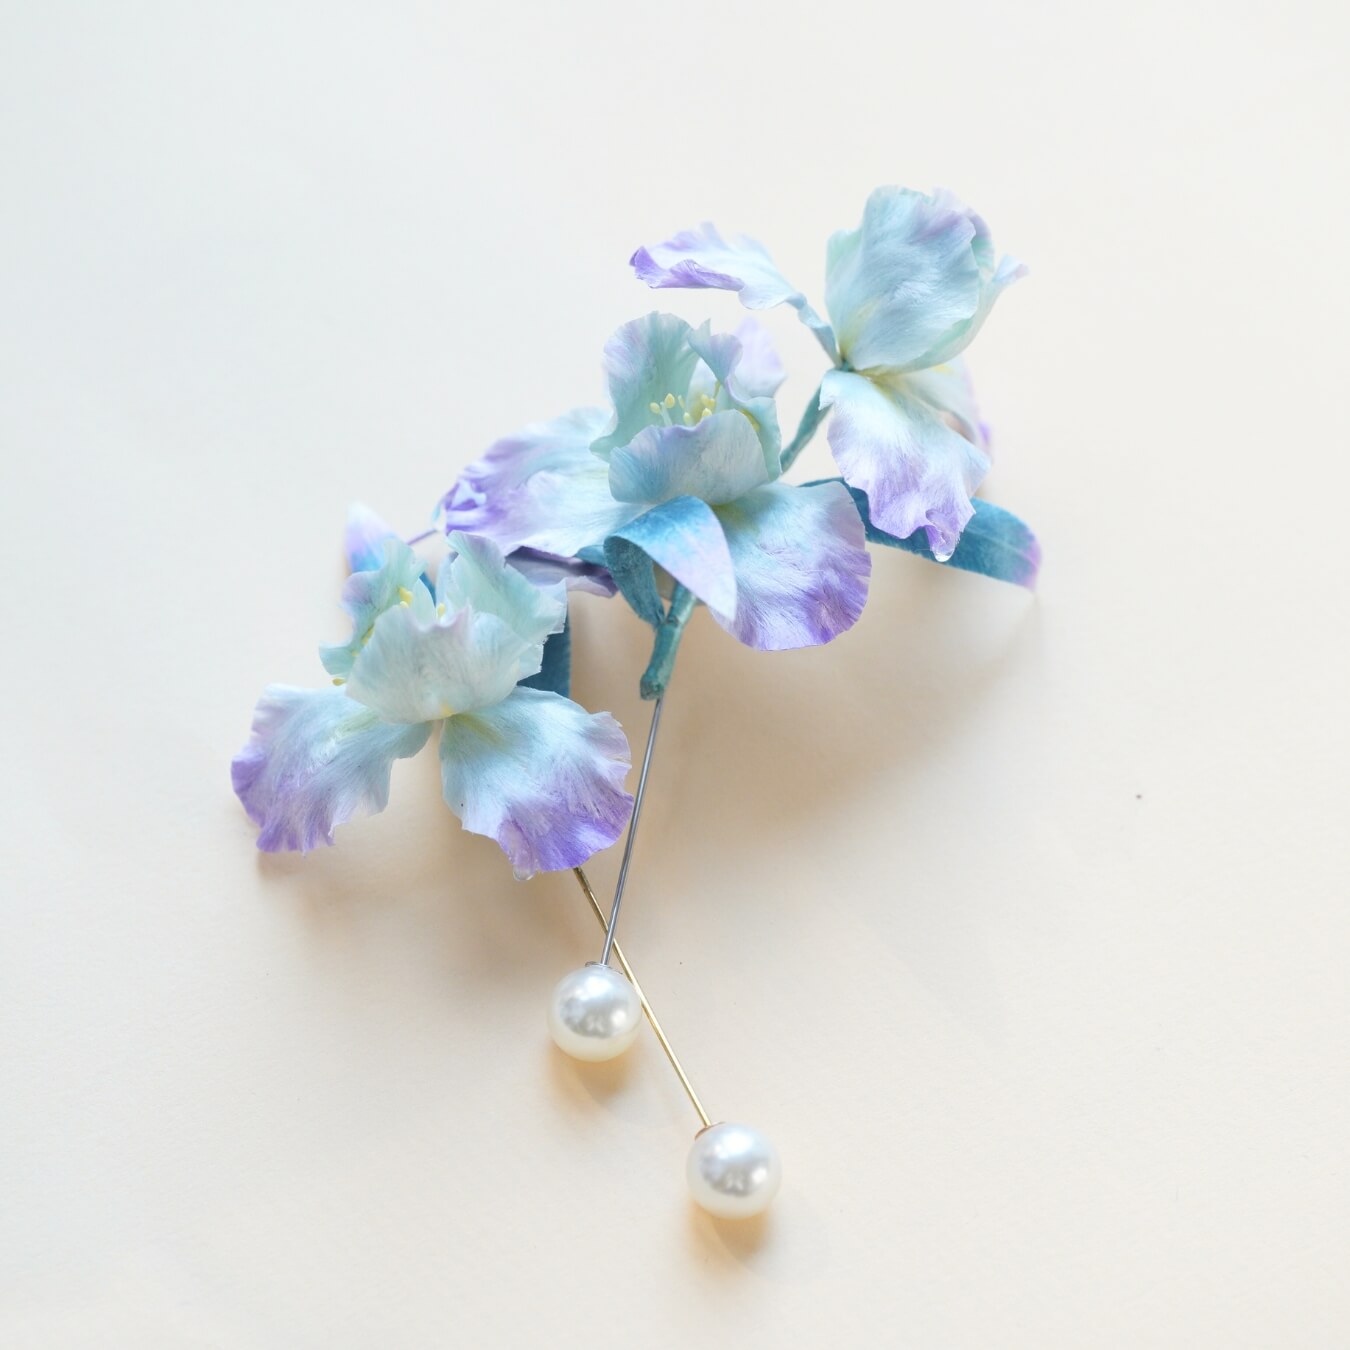
Das war's – deine Ronghua Pink Bloom Haarnadel ist fertig!


Einen Kommentar hinterlassen
Alle Kommentare werden vor der Veröffentlichung moderiert.
Diese Website ist durch hCaptcha geschützt und es gelten die allgemeinen Geschäftsbedingungen und Datenschutzbestimmungen von hCaptcha.